Kafka-connect: overview
Table of contents
Kafka-connect: overview
Imagine you have a task where you need to fetch some data from a database and incrementally store it in kafka or read the consumed data from kafka and store it in the database. You can solve both tasks using plain kafka consumer/producer API or even use kafka streams library, but if you don’t need comprehensive data transformations (e.g. enrichment, stream joining) then you can use Kafka connect for it.
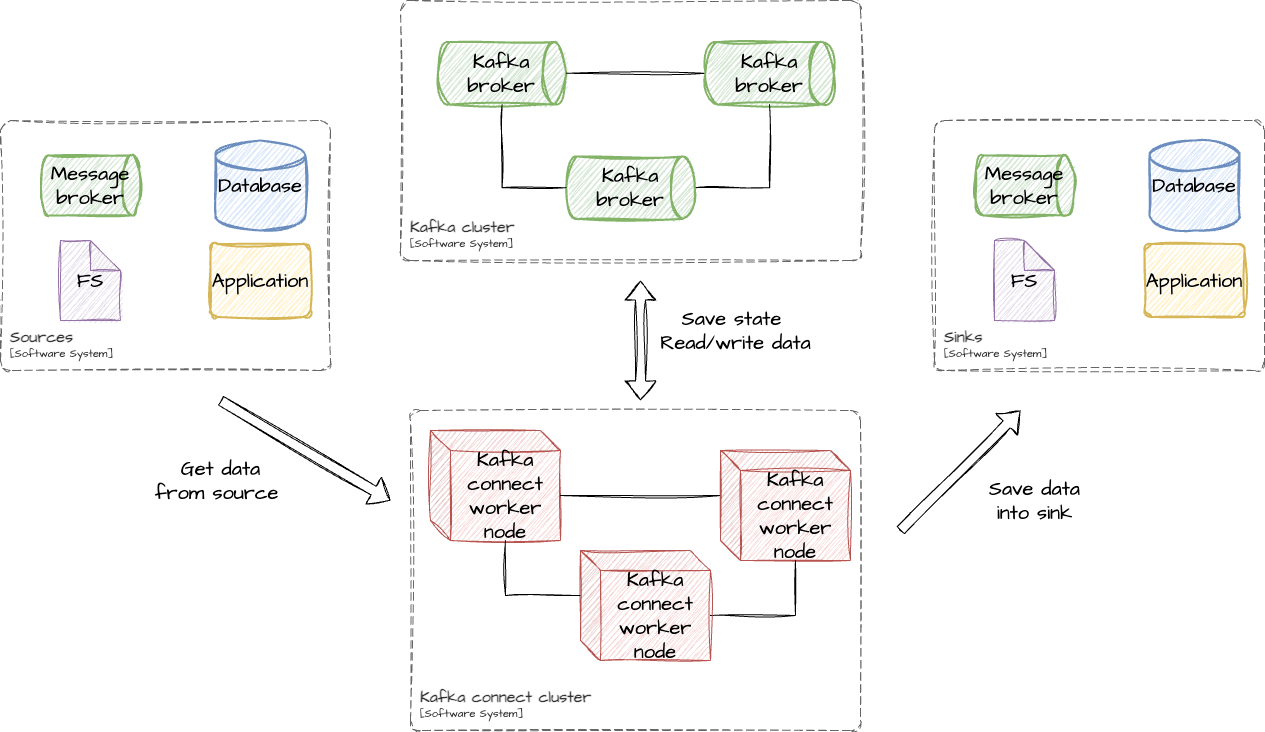
Kafka connect – is a framework that allows to stream data from and into the Kafka.
Also, there are concepts like source and sink.
Source – is a software system which can produce data. It may be an application, which expose data via API, or database, which produce CDC events or anything else.
Sink – is a software system which can store or handle data. Like a source, It also can be a database, file system or anything else. It may be even just an API which will be called on each consumed message.
But initially Kafka connect doesn’t know how to extract data from source and save it into sink. To tell it a special connector should be defined.
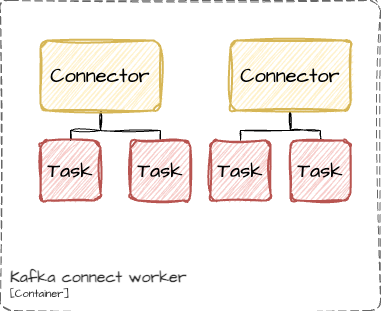
Connector – is a main logical component of Kafka connect. Connector is divided into single or multiple tasks.
Connector and task – both are logical components. To be able to execute task kafka-connect cluster needs something physical. In Kafka-connect cluster worker is responsible for the task execution.
Connectors
In Kafka connect connector may mean two things:
Connectorplugin – actual jar(s) file(s) of the connectorConnector– registered connector in Kafka connect
To be able to create a connector in Kafka connect connector’s plugin should be installed on all Kafka connect nodes.
Connector is a logical component which describes data stream in or out of the kafka. Also, connector is responsible for task management.
Kafka connect already has a bunch of pre-installed connectors but if it is not enough you can always use other available open-source connectors or even create one by yourself.
Tasks
Task – another logical component coordinated by connector instance. Task is the main connector’s unit of parallelism.
The closest analogy for task is a consumer in the consumer group. They are similar because multiple tasks of the single connector balance data stream between each other and also may re-balance it
if some tasks are failed (but failure should not be a fatal).
If connector manage tasks and describes what should be done, task describe actually how it should be done. Also, task
is responsible for state storage.
State
State – is a crucial part for every streaming processing. As mentioned earlier, task is responsible for state storage.
The important thing is that task doesn’t store anything in itself – all state changes are stored in special kafka topics which are configured
for kafka connect cluster.
Distributed state consists of multiple parts:
- Offset storage (
offset.storage.topic) – place for storing processed offsets. It is not only offsets of kafka topics but also may be position of last processed row from DB or something like this which will indicate a point from which task can continue - Config storage (
config.storage.topic) – is a place for store configs of connectors - Status storage (
status.storage.topic) – this is a status of tasks
Standalone state consists of:
- Offset storage – in case of standalone mode it is a local file (
offset.storage.file.filename)
Depending on Kafka connect cluster mode (distributed or standalone) state will be stored differently:
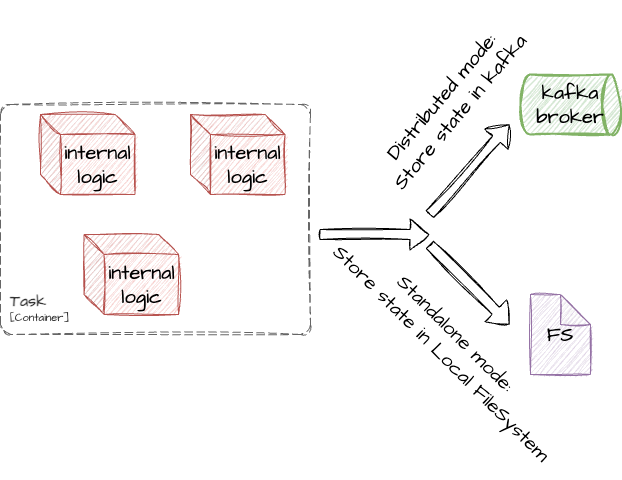
If kafka connect cluster running in a distributed mode then state will be stored in the kafka cluster itself, otherwise it will be stored in the local file system.
Workers
Previously we discussed logical components such as connectors and tasks. But those components should be run somewhere.
Worker – is a physical component which is responsible for running logical components. Simply, it is just a node which is part of kafka connect cluster.
Kafka connect cluster consists of worker nodes, and you can add or remove them almost dynamically. The only thing you should remember is that each node should have the same:
group.idoffset.storage.topicconfig.storage.topicstatus.storage.topic
Workers nodes will automatically discover each other if they have the same group.id value.
Sources and Sinks
Source – is a connector type which responsible for consume data from the outer system and store it into the selected kafka topic(s).
Sink – is a connector type which responsible for consume data from the selected kafka topic(s) and store these data into the outer system.
As you can see, both source and sink are connectors. Kafka connect has some pre-installed connectors but as mentioned earlier you can also write your own or install open-source connector.
Installing of the connector is a simple process: you just need a bunch of JAR files required for connector and put them into desired location of each worker node. Then you should update configuration
and specify that location to allow nodes discover and use it.
Converters
Converters in kafka connect is simply in/out-format.
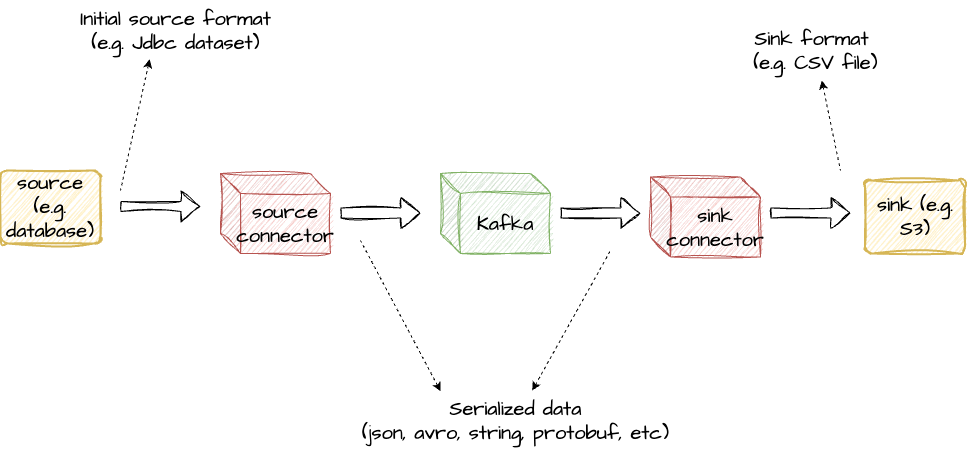
As you can see, source and sink initially has its own format. To be able to deliver data from
source to sink data should be saved in intermediate topic. Best option for this is to save data
using some common format like raw string, json, avro, protobuf or another format which can be used to efficiently
save data into kafka.
Let’s consider an example in which data will be extracted from database and saved in S3.
At the first step source connector will read some data from source table. Internally at this step connector will
have some Jdbc dataset. Of course, with some effort, this dataset can be saved in topic
(because kafka doesn’t care about format of saved data because for kafka everything is a byte array), but to be able to
use this data the data itself should be converted into something more convenient for transporting. And here converters show up.
In source connector converter convert data and after his step converted (or serialized) data saved in kafka topic.
Then sink connector read this data and converter convert it (or deserialize) into internal connector format.
This is done before sink actually process input data.
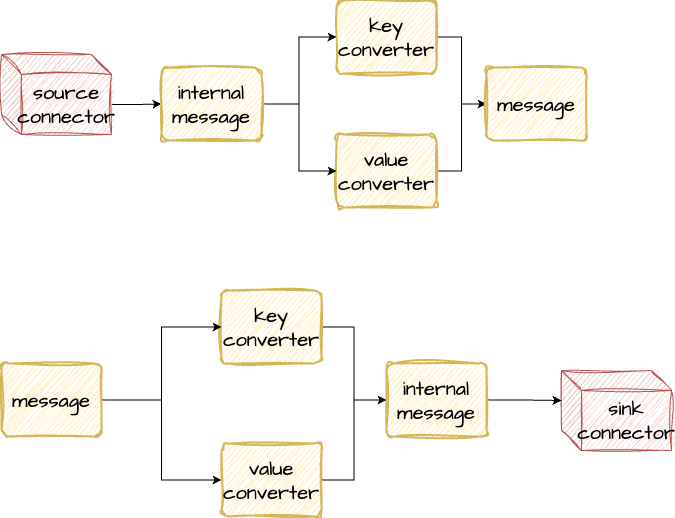
Each part of the message (key and value) may use different converters (e.g. key – string, value – avro).
Transforms
Transforms are another point of extension of each kafka connector. Using tranfroms you can achieve different output:
- Add or remove field
- Customize field value (e.g. mask it)
- Rename fields
- Extract nested fields and move them on top
- Set output kafka-topic (for sources)
- Customize headers
- And so on
Each transformation is applied on a single message. If there are multiple transformations then they are applied one by one:

As you can see output of each trasform is an input for the next one until the end.
It is a very powerful instrument which allows you to modify data, but keep in mind that this technique was designed
for simple transformation. If you need something more complex (like data joining, enriching or deduplication) then it is better to consider another instruments like KSQL or kafka-streams.
Example
So, let’s finish with theory and try something in practice. In this example I will not use docker, but will use pre-installed binaries for kafka and kafka-connect, because I believe that it will provide more insights of how to start and use kafka-connect.
First let’s configure kafka. For this zookeeper cluster is needed (in this sample I will not use modern kafka versions which can be run without zookeeper). Config for zookeeper:
tickTime=2000
dataDir=/tmp/zookeeper
clientPort=2181
And config for kafka broker:
broker.id=0
listeners=PLAINTEXT://localhost:9092
log.dirs=/tmp/kafka-logs
num.partitions=1
default.replication.factor=1
offsets.topic.replication.factor
zookeeper.connect=localhost:2181
min.insync.replicas=1
Both configs are pretty simple. All components will be run in a single-node installation. Now they can be started:
zookeeper-server-start -daemon {PATH-TO-CONFIG}/zookeeper.properties
kafka-server-start -daemon {PATH-TO-CONFIG}/kafka.properties
Ok, at this point single-node kafka cluster and zookeeper are running. Now kafka-connect cluster can be set up. Kafka-connect cluster will be started in a distributed mode.
bootstrap.servers=localhost:9092
group.id=connect-cluster
key.converter=org.apache.kafka.connect.json.JsonConverter
value.converter=org.apache.kafka.connect.json.JsonConverter
key.converter.schemas.enable=false
value.converter.schemas.enable=false
offset.storage.topic=connect-offsets
config.storage.topic=connect-configs
status.storage.topic=connect-status
offset.storage.replication.factor=1
config.storage.replication.factor=1
status.storage.replication.factor=1
rest.port=8083
Before kafka-connect worker will be started, let’s review its config:
bootstrap.servers– comma-separated hosts of kafka cluster brokersgroup.id– identifier of a worker group. Each worker in kafka-connect cluster should have the same group.id, otherwise it will be considered as another kafka-connect clusterkey.converterandvalue.converter– these are default converters for all connectorskey.converter.schemas.enableandvalue.converter.schemas.enable– determine if output/input data should include schema (final message envelop will include schema & payload)- topic names and replication factor – settings for internal topics for kafka-connect cluster
rest.port– port for rest API
After general overview of kafka-connect worker properties it can be finally started:
connect-distributed -daemon configs/2023/kafka-connect/worker.properties
If everything is ok, then you can get installed connectors using this command:
curl --location --request GET 'localhost:8083/connector-plugins'
Only default connectors will be used in this example such as FileStreamSourceConnector and FileStreamSinkConnector.
Connector configuring is a simple process. The only thing you need is a json-configuration of a desired connector. For FileStreamSourceConnector it may look like this:
{
   "name": "file-connector-without-schema",
   "config": {
      "connector.class": "org.apache.kafka.connect.file.FileStreamSourceConnector",
      "tasks.max": "1",
      "file": "/tmp/file.txt",
      "topic": "output-topic-without-schema",
      "key.converter": "org.apache.kafka.connect.json.JsonConverter",
      "value.converter": "org.apache.kafka.connect.json.JsonConverter",
      "key.converter.schemas.enable": false,
      "value.converter.schemas.enable": false
   }
}
Also, let’s create another one but with schemas enabled to see the difference:
{
   "name": "file-connector-with-schema",
   "config": {
      "connector.class": "org.apache.kafka.connect.file.FileStreamSourceConnector",
      "tasks.max": "1",
      "file": "/tmp/file.txt",
      "topic": "output-topic-with-schema",
      "key.converter": "org.apache.kafka.connect.json.JsonConverter",
      "value.converter": "org.apache.kafka.connect.json.JsonConverter",
      "key.converter.schemas.enable": true,
      "value.converter.schemas.enable": true
   }
}
Command to create connector:
curl --location --request POST 'localhost:8083/connectors' --header 'Content-Type: application/json' --data-raw 'json configuration'
After connector creation you can check its status:
curl --location --request GET 'localhost:8083/connectors/{connector-name}/status'
At this point, both source connectors should work well. All new data in the /tmp/file.txt will be sent into the configured topic, but output data will differ.
If /tmp/file.txt has a single row test1 then connector without schema will generate data test1, but connector with schema will generate:
{"schema":{"type":"string","optional":false},"payload":"test1"}
Usage of schema is depends on a concrete situation. For example, if you control the source topic, then it may be a good idea to save data with schema, but if not, then data may be already produced as a json without schema, and you forced to use connector with schemas disabled.
Let’s also review contents of connect-offsets:
kafka-console-consumer --bootstrap-server localhost:9092 --topic connect-offsets --from-beginning --property print.key=true --property key.separator="-"
Output should look like this:
["file-connector-without-schema",{"filename":"/tmp/file.txt"}]-{"position":6}
["file-connector-with-schema",{"filename":"/tmp/file.txt"}]-{"position":6}
Position in this case is a cursor position in the input file. If something new will be added into this file then it will be saved in the output file in a new row.
Now let’s create a sink connector:
{
   "name": "sink-file-connector",
   "config": {
      "connector.class": "org.apache.kafka.connect.file.FileStreamSinkConnector",
      "tasks.max": "1",
      "file": "/tmp/output.txt",
      "topics": "output-topic-without-schema",
      "key.converter": "org.apache.kafka.connect.json.JsonConverter",
      "value.converter": "org.apache.kafka.connect.json.JsonConverter",
      "key.converter.schemas.enable": false,
      "value.converter.schemas.enable": false
   }
}
If everything works well then file /tmp/output.txt should be created by FileStreamSinkConnector.
That’s it! In this example simple setup of kafka, zookeeper and kafka-connect were build.
Usually in a real life custom connectors will be used (e.g. debezium, jdbc-sink, jdbc-source, hdfs, s3 and so on), but connectors like FileStreamSinkConnector are the best to experiment with kafka-connect itself.
To stop everything use this commands:
# to stop connector worker it is better to pause every connector and then use kill <pid> command. In this case we can use just kill
kill <pid of connector-worker process>
kafka-server-stop
zookeeper-server-stop
Conclusion
In this article we considered main conpects of a kafka-connect cluster, how to use it and set up simple playground.
A lot of questions (load balancing, fault tolerance, connectors installation, custom connectors) were considered not profoundly or were not considered at all, but even with such a simple playground you can experiment and get more insights of how everything work.
I hope that it was useful :)