PostgreSQL: Log-based CDC using debezium
Table of contents
- Introduction
- CDC: Change Data Capture
- How Postgres handle data changes?
- Logical replication and WAL
- Debezium
- Conclusion
Introduction
In this little article I’ll show different ways to set up debezium for log-based CDC. Before diving into details about debezium, I’ll shortly describe CDC and why it may be helpful in some tasks.
CDC: Change Data Capture
In the Internet the CDC is described as a design pattern which allows to track data changes (deltas).
Let’s consider this approach on table user_balances. Initial state of table is:
| user_id | balance | last_updated |
| 1       | 100     | 2024-01-01   |
| 2       | 100     | 2024-01-01   |
| 3       | 100     | 2024-01-01   |
We have three users and all of them have the same balances. After some time the table content has changed to:
| user_id | balance | last_updated |
| 1       | 200     | 2024-01-02   |
| 2       | 150     | 2024-01-03   |
| 3       | 50      | 2024-01-04   |
| 4       | 500     | 2024-01-05   |
Each user were updated and also the new one was added. The question is how to track these changes?
Imagine that you develop some kind of audit application, and you have to track each change of this table.
Your goal will be to get something like that:
| __operation__ | __timetamp__  | user_id | balance | last_updated |
| UPDATE        | 2024-01-02    | 1       | 200     | 2024-01-02   |
| UPDATE        | 2024-01-03    | 2       | 150     | 2024-01-03   |
| UPDATE        | 2024-01-04    | 3       | 50      | 2024-01-04   |
| CREATE        | 2024-01-05    | 4       | 500     | 2024-01-05   |
And CDC can help you with it. Let’s move on and consider different ways to achieve this.
How Postgres handle data changes?
Postgres ensures durability using WAL (write-ahead log). WAL allows to recover from failures and using WAL files it is also possible to replicate data to other replicas. In free interpretation, replication based on WAL is possible because each WAL file contains committed changes of each transaction. The last point that WAL allows to replicate data is crucial. As we know that each change is written in WAL we can somehow use it for CDC.
Logical replication and WAL
WAL is enabled and to use it nothing more should be done. However, to be able to use WAL in a replication terms some additional setup must be done.
The most interesting setting for our case is wal_level. There are other settings which also important but for simplicity we’ll consider only this one.
wal_level may be set as:
- minimal
- replica
- logical
minimal level generates information that allow to recover DB from crash, but it’s not sufficient to any kind of replication. replica level is enough
to set up physical replication (e.g. log-shipping or streaming), due to WAL now will include information required for it, but it’s still not enough for out task. Only one level is remain, and it’s logical which as expected will help us to set up log-based CDC.
But why replica level wasn’t enough?
The reason why we need logical level is because for log-based CDC we need information about updates not on physical level but on logical.
In other words and very simplified, replica level generates records in WAL which contains information about where data was changed (like concrete pages), but logical contains information about what data was changed.
logical level is based on the same WAL files, but as it contains additional information data can be decoded using special plugins (like pgoutput, decoderbufs and others)
and decoded data will contain:
- operation
- row identifier*
- before
- after
operation indicate how this event was generated: DELETE, CREATE, UPDATE and in some cases TRUNCATE. row identifier may be considered as a primary key of a concrete tuple which was updated
but that’s not always like that. logical level requires that tuples should be distinguishable (because as we remember this info is used to indicate what data was changed and not where),
and usually it is achieved using PK, but some tables may not have PK. In such cases unique indexes may be used (all columns should have NOT NULL constraint) or if
nor PK, nor unique index exists, full row must be used as identifier. Keep in mind that if full row is used as identifier it’s also affect
amount of data generated in WAL. Because of that it is highly recommended to avoid such cases. Postgres allows to choose what should be used as a row identifier per table:
ALTER TABLE {table} REPLICA IDENTITY DEFAULT -- when PK exists
ALTER TABLE {table} REPLICA IDENTITY USING INDEX {index} -- when unique index exists
ALTER TABLE {table} REPLICA IDENTITY FULL -- when nor PK, not unique index exist
Finally, before and after contains information about how row looked before operation and after it.
Looking ahead, before not always included (for DEFAULT and INDEX bases replica identity). Also, not every column will be presented in after if it wasn’t changed (TOASTed columns).
More info about logical replication can be found in the article about logical replication in postgres.
Debezium
Debezium is an open source project that provides a low latency data streaming platform for change data capture (CDC). Debezium has many connectors to the different RDBMS, but in current case we are interested in postgres connector. Debezium can be run as a kafka-connect connector or as a separate application (debezium-server or hand-made debezium-application) and we’ll shortly see how it can be done.
Database setup
For the next examples postgres in docker will be used:
services:
  database:
    image: postgres:17
    ports:
      - "5432:5432"
    healthcheck:
      test: ["CMD-SHELL", "pg_isready -U postgres -d postgres"]
      interval: 10s
      timeout: 5s
      retries: 5
      start_period: 10s
    environment:
      POSTGRES_PASSWORD: postgres
      POSTGRES_USER: postgres
      POSTGRES_DB: postgres
    command:
      - "postgres"
      - "-c"
      - "wal_level=logical"
      - "-c"
      - "max_wal_senders=5"
      - "-c"
      - "max_replication_slots=5"
To create a slot and publication the next queries should be used:
SELECT PG_CREATE_LOGICAL_REPLICATION_SLOT('debezium_slot', 'pgoutput'); -- require superuser
CREATE PUBLICATION debezium_publication; -- debezium also can create publication by itself, but for clarity we will create it manually
You can choose almost any type of table for testing, but in this article i’ll use this one:
CREATE TABLE public.data(
  id BIGINT PRIMARY KEY,
  payload TEXT NOT NULL,
  created_at TIMESTAMP WITH TIME ZONE NOT NULL DEFAULT now(),
  updated_at TIMESTAMP WITH TIME ZONE NOT NULL DEFAULT now()
);
and this table will be added to the created publication manually:
ALTER PUBLICATION debezium_publication ADD TABLE public.data;
Debezium-server
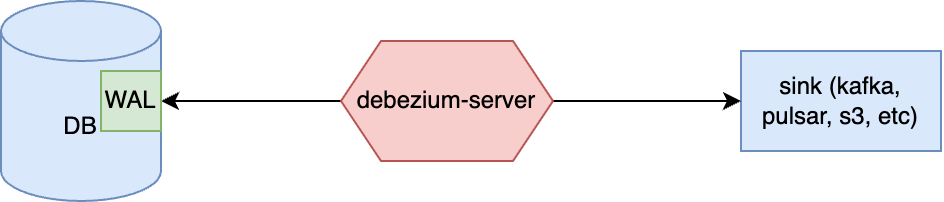
In general words, debezium-server is an application which is already written for you using debezium-embedded module (there are additional modules but this one is the most crucial).
As it is a complete application, the only step you need to do is to configure it before start (according to documentation):
# download archive
curl -O https://repo1.maven.org/maven2/io/debezium/debezium-server-dist/3.4.0.Final/debezium-server-dist-3.4.0.Final.tar.gz
tar -xvzf debezium-server-dist-3.4.0.Final.tar.gz
cd debezium-server-dist-3.4.0.Final/
# run
./run/sh
And that’s it.
Debezium-engine
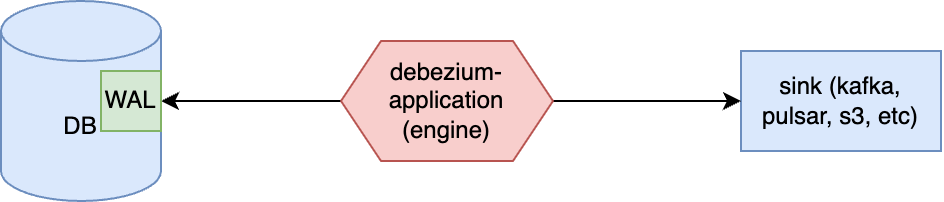
The next option to use debezium is to build application based on debezium-embedded by yourself. Complete example can be found here. The most important part of such an application is DebeziumEngine instance:
Properties properties = new Properties();
// initialize properties

EventConsumer<String, String> consumer = new EventConsumer<>() {...};  // consumer instance
DebeziumEngine<ChangeEvent<String, String>> engine = DebeziumEngine.create(Json.class)
                .using(properties)
                .notifying(consumer)
                .build();

ExecutorService executor = Executors.newSingleThreadExecutor();
executor.execute(engine);
In this short example DebeziumEngine is created which will read events and pass them as a json entities to the specified consumer. You can always choose another format (predefined or using your own based on raw binary arrays). Consumer is a simple interface which may looks like this:
public class JsonEventConsumer implements EventConsumer<String, String> {
    private static final Logger logger = Logger.getLogger(JsonEventConsumer.class);

    @Override
    public void handleBatch(List<ChangeEvent<String, String>> records, DebeziumEngine.RecordCommitter<ChangeEvent<String, String>> committer) {
        try {
            records.forEach(it -> {
                try {
                    logger.infof("Record: %s", it.value());
                    committer.markProcessed(it); // should be called for each record (or at least for the last one)
                } catch (InterruptedException e) {
                    throw new RuntimeException(e);
                }
            });
            committer.markBatchFinished(); // should be called when batch processing is complete -> may trigger offsets committing
        } catch (InterruptedException e) {
            throw new RuntimeException(e);
        }
    }
}
To make this example complete let’s review minimal set of properties which can be used to run it:
Properties properties = new Properties();
properties.setProperty("name", "local-application");
properties.setProperty("connector.class", "io.debezium.connector.postgresql.PostgresConnector");
// offset storage settings
properties.setProperty("offset.storage", "io.debezium.storage.jdbc.offset.JdbcOffsetBackingStore");
properties.setProperty("offset.storage.jdbc.table.name", "debezium_postgresql_engine_offsets");
properties.setProperty("offset.storage.jdbc.table.ddl", "CREATE TABLE %s (id TEXT PRIMARY KEY, offset_key TEXT, offset_val TEXT, record_insert_ts TIMESTAMP NOT NULL, record_insert_seq INTEGER NOT NULL)");
properties.setProperty("offset.storage.jdbc.connection.url", "jdbc:postgresql://localhost:5432/postgres");
properties.setProperty("offset.storage.jdbc.connection.user", "postgres");
properties.setProperty("offset.storage.jdbc.connection.password", "postgres");
properties.setProperty("offset.flush.interval.ms", "60000");
// database settings
properties.setProperty("database.hostname", "localhost");
properties.setProperty("database.dbname", "postgres");
properties.setProperty("database.port", "5432");
properties.setProperty("database.user", "postgres");
properties.setProperty("database.password", "postgres");
properties.setProperty("publication.name", "debezium_publication");
properties.setProperty("slot.name", "debezium_slot");
properties.setProperty("plugin.name", "pgoutput");
properties.setProperty("snapshot.mode", "NO_DATA"); // disable initial snapshot for this sample
properties.setProperty("topic.prefix", "local");
The benefit of this variant is definitely that you can control almost everything from the point you get data to the point you save data into the sink (also you can choose every sink you want). But the drawback is that you have to code it manually which not always an option due to time, resources, risks, cost of support and so on.
Kafka-connect connector
Finally, the last option for running debezium is inside kafka-connect cluster as a source connector.
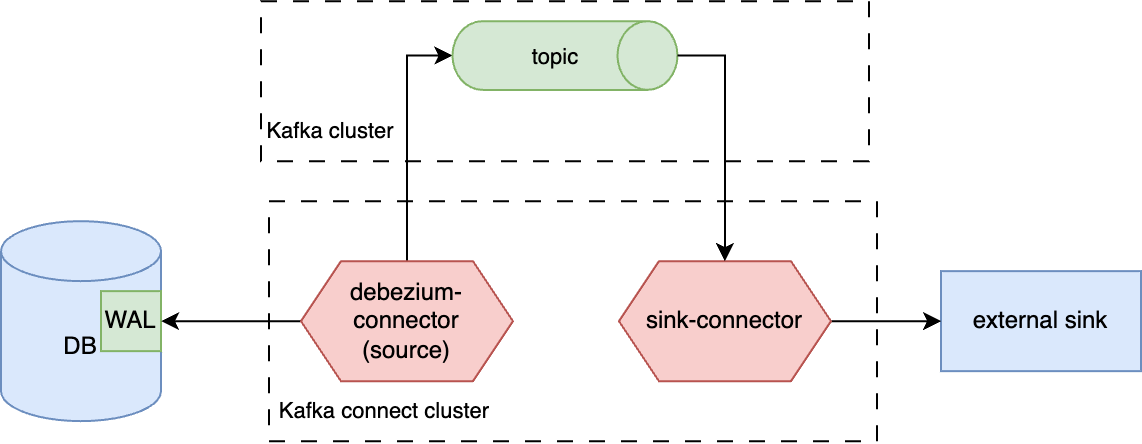
The target sink for debezium in this case is always a kafka topic.
To play with this variant you can use the next docker-compose.yaml:
services:
  postgres:
    image: postgres:17
    ports:
      - "5432:5432"
    healthcheck:
      test: [ "CMD-SHELL", "pg_isready -U postgres -d postgres" ]
      interval: 10s
      timeout: 5s
      retries: 5
      start_period: 10s
    environment:
      POSTGRES_PASSWORD: postgres
      POSTGRES_USER: postgres
      POSTGRES_DB: postgres
    command:
      - "postgres"
      - "-c"
      - "wal_level=logical"
      - "-c"
      - "max_wal_senders=5"
      - "-c"
      - "max_replication_slots=5"

  redpanda:
    image: redpandadata/redpanda:v24.2.25
    command:
      - redpanda
      - start
      - --smp
      - '1'
      - --reserve-memory
      - 0M
      - --overprovisioned
      - --node-id
      - '0'
      - --kafka-addr
      - PLAINTEXT://0.0.0.0:29092,OUTSIDE://0.0.0.0:9092
      - --advertise-kafka-addr
      - PLAINTEXT://redpanda:29092,OUTSIDE://localhost:9092
      - --pandaproxy-addr
      - PLAINTEXT://0.0.0.0:28082,OUTSIDE://0.0.0.0:8082
      - --advertise-pandaproxy-addr
      - PLAINTEXT://redpanda:28082,OUTSIDE://localhost:8082
    ports:
      - "9092:9092"
      - "8081:8081"

  debezium:
    image: quay.io/debezium/connect:3.3.1.Final
    environment:
      BOOTSTRAP_SERVERS: redpanda:29092
      CONFIG_STORAGE_TOPIC: connectors
      OFFSET_STORAGE_TOPIC: offsets
    depends_on:
      - redpanda
    ports:
      - "8083:8083"

  schema-registry:
    image: apicurio/apicurio-registry:3.0.9
    ports:
      - "8080:8080"
After you’ve started containers you can run this curl to create debezium connector:
curl --request POST \
  --url http://localhost:8083/connectors \
  --header 'content-type: application/json' \
  --data '{
  "name": "debezium-postgres-connector",
  "config": {
    "connector.class": "io.debezium.connector.postgresql.PostgresConnector",
    "database.hostname": "postgres",
    "database.port": "5432",
    "database.user": "postgres",
    "database.password": "postgres",
    "database.dbname": "postgres",
    "database.server.name": "postgres",
    "plugin.name": "pgoutput",
    "slot.name": "debezium_slot",
    "publication.name": "debezium_publication",
    "table.include.list": "public.data",
    "topic.prefix": "local",
    "key.converter": "org.apache.kafka.connect.json.JsonConverter",
    "key.converter.schemas.enable": "false",
    "value.converter": "org.apache.kafka.connect.json.JsonConverter",
    "value.converter.schemas.enable": "false",
    "snapshot.mode": "NO_DATA"
  }
}'
After everything has done, you can execute DML queries on public.data table and every update will be saved into the target topic.
The name of the target topic will be generated using topic.prefix and full table name (schema + name).
More info about kafka-connect can be found in the article about kafka-connect.
Conclusion
In this article we’ve shortly seen how debezium can be used for log-based CDC in postgres. Also, we’ve seen different ways of debezium setup. I didn’t compare them because each of them obviously has its cons and pros and final decision will be done not only depending on technical aspects, but on concrete task which may has specific limitations. My goal was to show these options and give some examples which will allow you to start experimenting with debezium as fast as possible.
Finally, debezium is a good choice for CDC (if considering log-based variant), but CDC can be done using other techniques which will be considered in the future article.